

Since I got my Roccbox a little over a year ago, I reckon I’ve baked well over 150 sourdough pizzas in that little workhorse of an oven! Although I often make minor tweaks to my formula, the below is my ultimate go-to when I want a really flavoursome crust with plenty of extensibility.
Before I detail my formula, I want to explain what I am aiming for with my pizza dough (and also by extension what I am not aiming for) so that you can decide if this type of dough is for you – if not there are formulas out there for every type of pizza imaginable.
My favourite style of pizza is Neopolitan. That fluffy, aerated cornicione that runs around the outside of the pizza, topped with simple, high-quality ingredients and baked hot and fast. To this day I can still vividly remember sitting down at Pizzeria De Michele in Naples almost 7 years ago and spending 90 seconds in pizza-heaven as I inhaled their classic ‘Pizza Margherita’. Traditionally, the dough for Neopolitan pizzas is made from a simple formula of fresh yeast, highly-processed white flour (often called ’00 flour’ in Australia), salt and water.
As with all my doughs, I always like to tweak my formulas as much as I can to increase the nutritional value, flavor and digestibility of the end product. Pizza is no different. I take the classic formula and swap out fresh yeast for a sourdough levain, change the highly processed white ’00’ or ‘pizza flour’ out for a stoneground organic bakers flour, and include 15-25% of freshly milled wholegrain flours. These changes allow me to then increase the hydration of my dough closer to that of a bread dough – 73-75% water to total flour – which gives the dough a much silkier feel, and (I think) a more enjoyable crust to eat. In order to follow the below guide, you will definitely need to follow the sourdough aspect of this, however feel free to skip the flour changes and proceed with whatever flour you like! But remember to drop the water % if you are using more refined flours as they will not absorb as much water.
Enough talk! Pizza time…
MAIN FORMULA
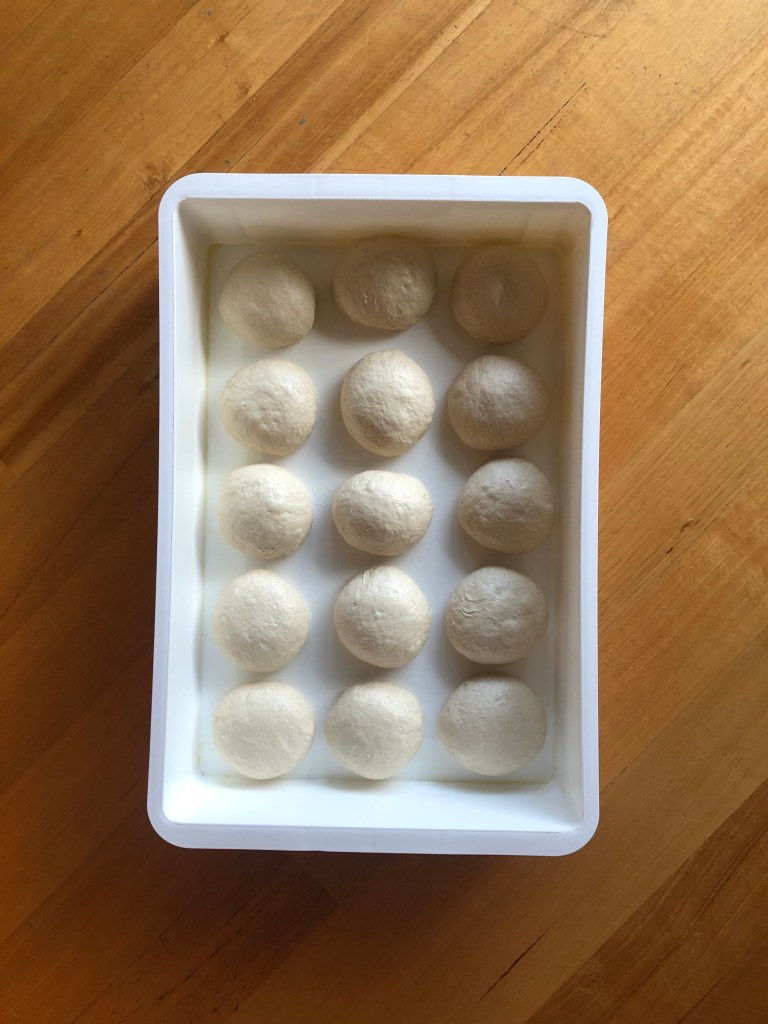
Yields: 4x 265 gram pizza balls (approx.)
440 grams of white bread or pizza flour*
55 grams of wholegrain spelt flour
55 grams of wholegrain wheat flour
110 grams of mature liquid sourdough starter (100% hydration)
405 grams of water (24-28 degrees Celsius in summer, 28-32 degrees in winter)
11 grams of fine salt
METHOD
1. Measure out 385 grams of the water (70%) into a medium bowl, add your starter to the water and gently disperse until there are no lumps of starter remaining;
2. Add your flour into the mixture and bring together into a dough, knead for 3-5 minutes, cover the bowl and leave in a warm place for half an hour;
3. After 30 minutes of resting, sprinkle the salt over the dough, pour over the remaining 20 grams of water to help integrate the salt and pinch through as the dough breaks apart and comes back together. Knead for a further 1-2 minutes until the dough re-forms and you feel the strength developing in the dough. Cover & leave to rest;
4. After 30-45 minutes give the dough a stretch & fold in the bowl and cover again to prevent a skin forming; place the bowl in the fridge which begins the slow bulk fermentation. The dough can now be left for anywhere from 12 to 36 hours to develop flavour. Note that as this formula utilises a fairly short initial warm bulk fermentation before we transfer to the fridge, it is important that you are using an active sourdough starter (one fed at least daily and kept at warm ambient temperature) and also achieving a desirable dough temperature – that’s 24-26 degrees C if you have a thermometer. This will ensure that your dough has achieved enough fermentation activity before being ‘slowed down’ that it is able to carry through to a well-fermented final dough.
5. Depending on when you want to bake your pizza, take the dough out of the fridge at least 2 hours beforehand in summer, or at least 4 hours beforehand in winter, divide into 4 equal pieces of approximately 260 grams each and shape into taught round balls. Rest covered either in individual oiled tubs, or in a suitably large enough rectangular pizza or Tupperware container. Cover and leave until ready to eat.
6. To shape, build a flour pile on your work bench (mix 50/50 white rice flour & 00 or bakers white four together) and tip a dough ball out into the flour pile. Begin pressing gently down from the middle out, stopping before the edges so that a ring of air is left – this will be your crust. Flip over and repeat which should continue to bring the dough out further and further. After repeating this process of pressing and flipping several times you can finish off the gentle ‘drawing out’ of the pizza ball by lifting the dough up into the air and, using your hands in fists gently draw them away from each other and stretch the dough. Rotate 90 degrees and repeat. Four turns of this should bring your dough out into your final pizza form – a 10-12 inch pizza base depending on how extensible your dough is. Your slow-fermented pizza base is now ready to receive its toppings!
NOTES ON BAKING
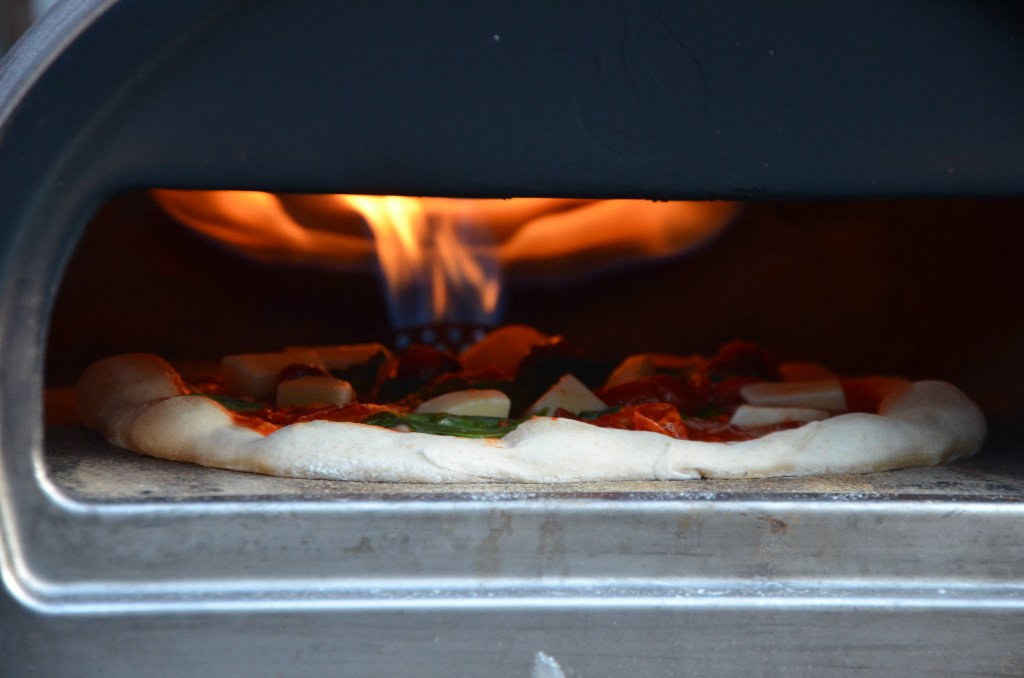
Every oven is different, as is every baker or eater’s preference for how deeply-baked they like their pizza to be. I bake with the aim of achieving some minor black spotting on the surrounding cornicione (crust) and my cheese being melted & pooled but not browned or crispy. To bake a pizza to this style I would recommend the following:
Roccbox
Pre-heat for at least 40 minutes at maximum flame. This should enable Roccbox to hit at least 450 C. Allow to cool slightly to approximately 400 C by turning the flame down. Load the pizza and crank back up to about 80% flame. Bake for about 60 seconds then rotate 90 degrees, leave for another 10-20 seconds and then repeat 2 further times so as to cook evenly on all 4 sides. Remove as soon as crust starts to show signs of black spots on all sides.
Home Oven – Easy Method
Pre-heat your oven at the highest temperature it will go with your pizza stone, baking steel or tray inside on the middle rack. When your pizza is shaped and ready to go, place on a pizza peel and slide onto your stone/steel/tray in the oven. Bake for 3-5 minutes depending on how high your oven can go and how well it heats and bakes (e.g. if it’s a good oven and can hit 250 degrees C then your bake time will be closer to 3-4 minutes, whereas an older, slower oven may need 5-6 minutes for the pizza to be fully baked).
Home Oven – Fancier Method (aka PITA method)
In this method you’re utilizing a combination of two types of cooking to try and maximise the result you can achieve without any specialist pizza equipment. Baking pizza in a home oven on a tray makes it very difficult to achieve a result anywhere near what a good pizzeria can produce. This is because you’re not able to get enough heat into the dough for it to properly expand and become airy before the crust sets. The result is usually a fairly dense pizza with an overly crispy, shattering crust (especially with dough formulas that use really low hydrations as the dough just dries out so quickly in a home oven). To combat this, you can split the baking into two steps – first you blast the underside of the dough to enable it to really spring up and for the base to cook through properly, and then you hit the top with heat to ensure a perfect melting & cooking of your toppings.
Place a tray (or pizza stone / baking steel if you have one) on the highest rack in your oven just underneath the grill / broiler. Crank it to maximum temperature at least 20-30 minutes in advance. Take a heavy-based pan (ideally cast iron) and place on maximum heat on your oven top (variously called a hob, hot plate, stovetop, you get it). Shape your pizza base and carefully lift in your hands over the pan and drop the base straight down into the pan (make sure you don’t put any oil, water, flour etc. into the pan – it should be clean). Give the pizza 30-60 seconds to start puffing up and cooking from the bottom then start building your pizza in the pan. Once 2-3 minutes have passed and your pizza has been topped, use a heat-proof utensil to check the underside – it should have small char marks / black spots which indicates it is cooked. Now take the pan and slide it straight into your oven under the grill / broiler that is set to maximum. Let the top melt & cook to your liking, remove from the oven when done, and enjoy!
PIZZA TOPPINGS
Below are some of my favourite combinations for topping this delicious sourdough base.
Truffle Mushroom
– Quality pure cream (for Aussies – try to get Schulz or Barambah organic cream)
– Mixed mushrooms, finely sliced
– Finely grated parmesan / grana padano
– Mozzarella, diced
– Truffle oil (optional but highly recommended)
– Fresh parsley, finely chopped (also optional)
Spoon 3-4 generous teaspoons of the pure cream onto your shaped dough, smear it evenly around as you would with a tomato sauce. Sprinkle half the grated parmesan over the cream then top with the sliced mushrooms and diced mozzarella. Bake accordingly to your oven then once baked top with the fresh parsley and truffle oil. Enjoy!

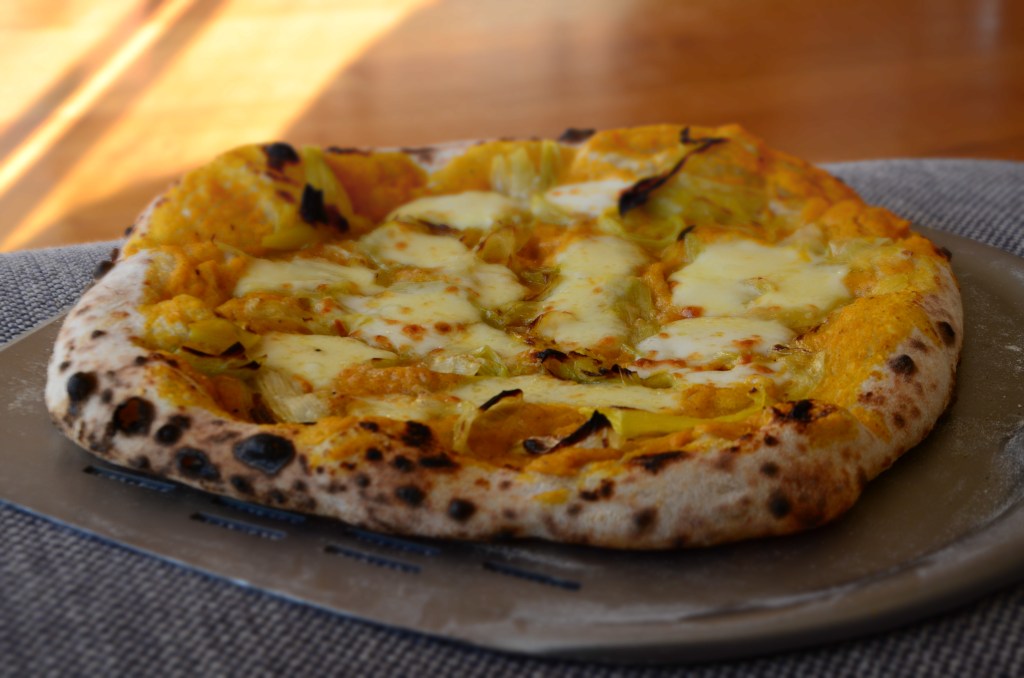
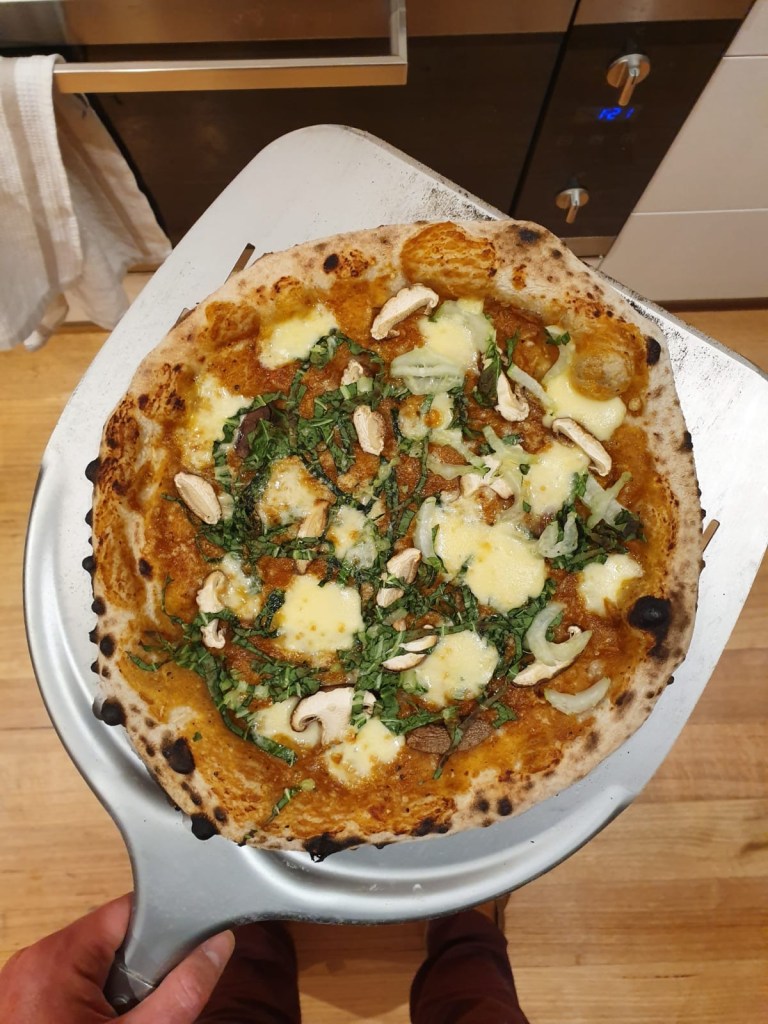
Ghee-poached Leeks & Pumpkin
– Pumpkin cream sauce (see below for process)
– 1x large leek or 2 small leeks, chopped into strips & gently poached in ghee (or 50/50 butter + olive oil) for 15-20 minutes on a low heat;
– Mozzarella, diced
To make the pumpkin sauce, peel & cube half a butternut pumpkin, coat in oil, salt & pepper and roast in a medium oven (175-200 C) until very soft, cool slightly then mash in a bowl with 4-5 tablespoons of thick organic cream (think Schulz or Barambah organic cream). Spread several teaspoons of the pumpkin sauce over your shaped pizza base, and top with sprinklings of the poached leeks and diced mozzarella. Bake.
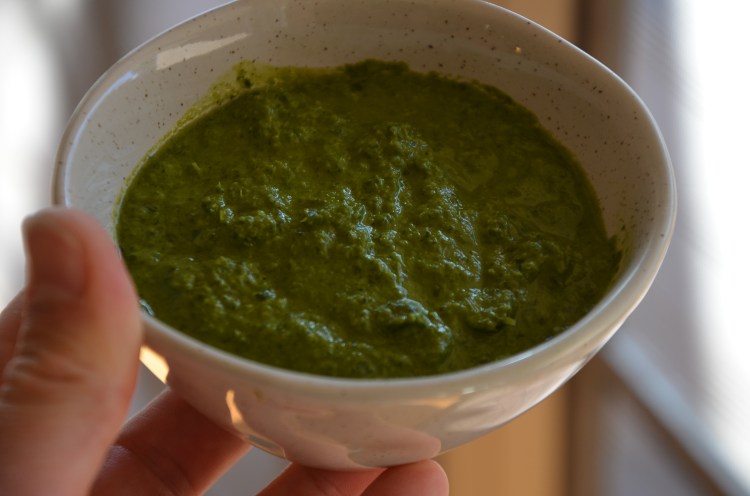
Herby Apple & Caramelised Onion (100% shout out to @scruffybakes)
– Green herb sauce (see below for process)
– Caramelised red onion
– Apple, finely sliced
– Mozzarella, diced
Make the herb sauce by placing into a blender the juice of 1-2 lemons, 2-3 tablespoons of olive oil, a pinch of salt & pepper, and any mixture of 1/2 a bunch of several soft green herbs that you have – I like basil + parsley + oregano. Pulse into a vibrant green sauce and place in a small bowl for ease of use (this will make enough sauce for 2-3 pizzas). To make the pizza spoon several teaspoons of the herby green sauce onto your shaped base, then arrange the thinly sliced apples in a layer over the sauce. Sprinkle the caramelised red onions sparingly over the top and then the mozzarella. Bake.
Miso Hungry
– Miso pumpkin sauce (see below for process)
– Small handful of shiitake mushrooms, chopped
– Pak choy leaves, 3-4 chopped
– Mozzarella, diced
– Fresh coriander, finely diced (optional)
Make the miso pumpkin sauce by peeling & chopping 300-350 grams of pumpkin (butternut if possible) into small pieces. Coat in 1-2 tablespoons of oil and toss with salt & pepper, a pinch of cinnamon & ground cloves (optional) put in a roasting tray and roast in a 200 degree oven for 15-20 minutes or until cooked & slightly charred at the corners. Once cooled place in a blender with a teaspoon of miso paste, a dash of rice wine vinegar, a few twists of black pepper and a dash of soy sauce or tamari, blend into a thick sauce.
To assemble the pizza spread several heaped teaspoons of the miso pumpkin sauce on your shaped pizza base, sprinkle around the chopped mushrooms and pak choy (or other asian green such as bok choy) and top with the mozzarella. Bake and then top the finished pizza with a small handful of the coriander.
Squashage
– Tomato sauce (I like crushed San Marzano tomatoes + a pinch of sea salt)
– ½ a pork & fennel sausage, filling removed and separated into small pieces
– ½ a cup of roasted cubed pumpkin
– Fresh red chilli, finely sliced
– Mozzarella, diced
– Fresh basil
Spread several teaspoons of tomato sauce onto the base of your shaped pizza and drop a handful of basil leaves onto the sauce (or use to top the pizza after baking if you prefer). Sprinkle around the tiny pieces of sausage and then drop pieces of roasted pumpkin in between the sausage pieces and top with the sliced fresh chilli and diced mozzarella. Bake.

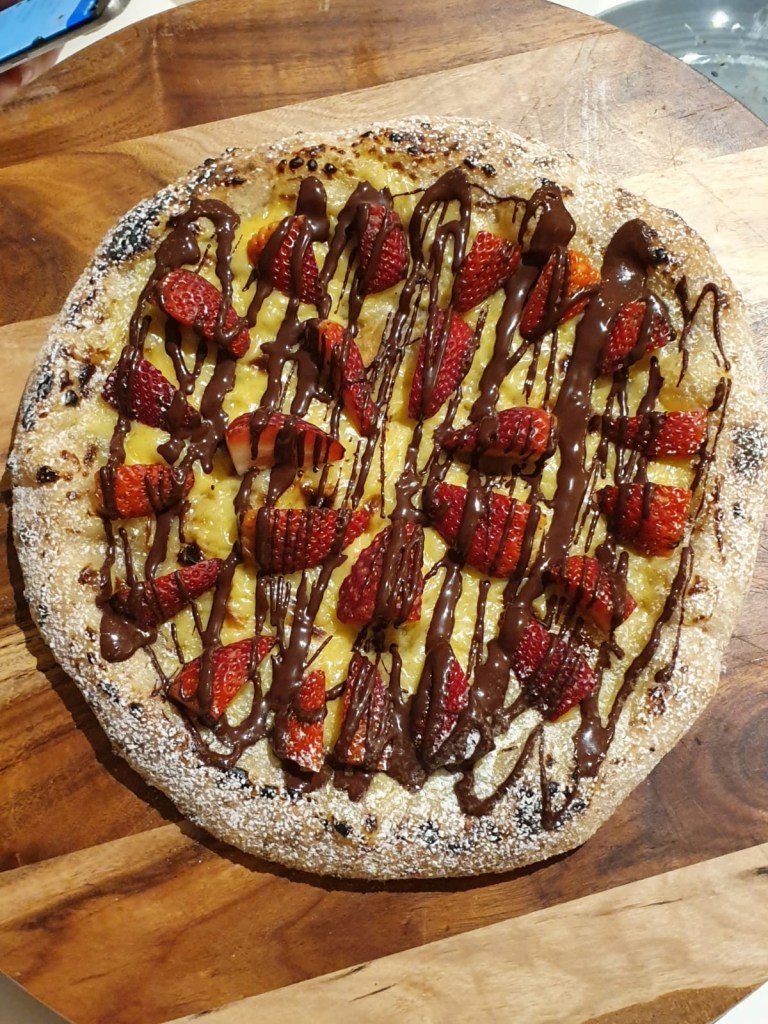
Custard & Strawberry Dessert Pizza (inspired by @Peddlingpizzas)
– Custard (for the sauce) I highly recommend making your own by following the Crema Paticcera formula in Maurizio’s sourdough bomboloni post;
– Handful of strawberries, chopped;
– 50 grams of quality dark chocolate, melted (or grated if can’t be bothered melting);
– Icing sugar for dusting (optional)
Spread several tablespoons of the custard over your shaped pizza base. Bake in a hot oven until the pizza is set and the custard also – it’ll get close to burning – kind of like a Portugese tart and this deep caramelisation will give you amazing flavour but watch closely as it can quickly go one step further to burnt! Once baked to a satisfying point, top with the fresh strawberries and dark chocolate. Serve immediately.
Conclusion
Is this really necessary? My year 10 English teacher would say you should always have a conclusion, but what else is there to say? Go make pizza!
Please let me know if you have any questions. There is a lot of information in this rambling post but even still I had to keep it brief in sections in order to keep under the word count. Oh wait no that’s year 10 again… 😐
*I use Wholegrain Milling stoneground organic bakers’ flour which is a really beautiful stone milled flour and therefore absorbs far more water than a traditional ‘pizza flour’ such as a 00 flour. You can use whatever white flour you like – if you use a more highly processed 00 flour then I would recommend dropping back the water amount from 74% to around 68-70%.

Definetely I want to try this recipe! When you mention mature starter you mean fully activated or we can instead use the discard?
LikeLike
Definetely I want to try this recipe! When you mention mature starter you mean fully activated or we can use instead the discard?
LikeLike
Hi there, you definitely want to use a mature and active starter for pizza dough. Otherwise you just won’t get much rise in the final pizza if you use discard. Enjoy!
LikeLike